Bump Keys
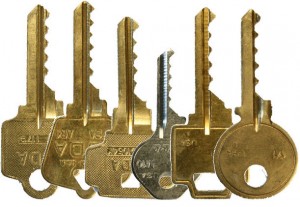
Bump Keys are incredibly effective at opening locks fast. They work exactly like the “fast zip” attack by transferring kinetic energy to the pin by using a key cut to the maximum depth on all pins. To use a bump key simply insert it to the maximum depth, pull it out one “click”, then strike the key with a bump hammer. Of course, the bump hammer can be the handle of a screwdriver, hair brush, or pretty much anything that can transfer the energy.
When the key is bumped in, the high points of the key strike the pins and cause them to jump above the shear line, all at the same time. At that moment (and this takes some practice) you turn the key and catch the pins at the shear line as the spring pushes them back down. It’s an easy and fast way to open stubborn locks and is very common in the criminal world.
.
Many people argue that bumping is only effective with standard pins, not security pins. I disagree and have produced a video on how to accomplish this.
.
There are rubber “bump washers” that fit onto the bow of the key that act like a rebound spring. It holds the key precisely one click out of the lock and allows you to hit the key repeatedly, machinegun style, in a very short time. Since discovering this method, it’s the only way I use bump keys because it’s so fast and efficient. You can find the rubber bushings online at UKBumpkeys for around $3 each.
Snap Guns
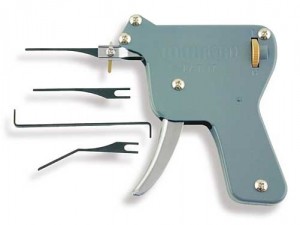 Snap Guns are the tools that every new picker wants because of mystical qualities invented in Hollywood. In movies the snap gun is the magical device that renders every lock inert. Insert snap gun, snap once and the lock falls open, right? Not really… Snap guns are kinetic tools that have a hardened needle that fits into the keyway.
Upon pulling the trigger, the needle snaps upwards to strike the pins. From that point, it works exactly like the other kinetic tools. They work great on locks containing standard pins and weak springs – the very locks that are very easy to pick or rake open. The problem with snap guns is that most of them don’t generate enough energy in their snap to overcome strong lock springs. The light needle is easily deflected by warding and their energy absorbed if the needle strikes the sides of paracentric keyways. They are noisy, irritating tools that take time, training and patience to use. Snap guns do have uses: wide open keyways, no security pins, weak springs, and an experienced user. Don’t expect to buy one and snap open every lock you find though.
.
Electro-Picks
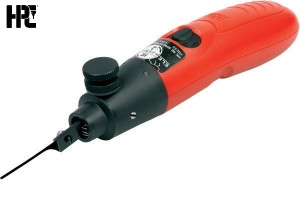 Electro-Picks are the next step up from snap guns. The electro-pick works exactly like the snap gun except it hits the pins at thousands of times a minute instead of tens. By sheer statistics, the electro-pick has better odds of hitting the shear line than the snap gun.
It has the same deficiencies as the snap gun and does require practice to operate successfully. Your success depends on the energy that the tool can impart to the pins. Most of the inexpensive, hobby-grade electro-picks are battery operated and really don’t generate enough energy to open most locks. They’ll still open standard pinned locks and those with weak springs, but that’s about it. The inexpensive electro-picks must swing their needle in a wider arc to generate their energy as well, restricting their use to open keyways. The more expensive professional-grade electro-picks usually have high current Lithium Ion battery packs or run from the mains. They generate a LOT of tip energy with minimal arc sweep, making them ideal for paracentric and tight keyways. The higher end models are variable in frequency pulse and impact strength, which improves the odds of defeating security pins and anti-bump pins.
Padlock Shimming
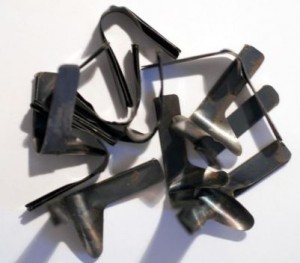 Padlock Shimming is a really fast way to get into padlocks that have spring loaded locking pawls that are easily compressed. Shimming will not work on locks that have a ball bearing locking mechanism because those cannot compress.
.
Core Shimming
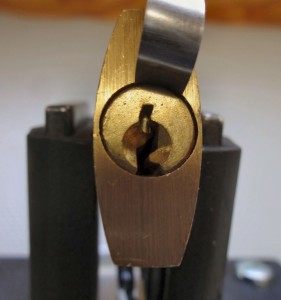 An obscure bypass technique is core shimming and is only possible in locks where the designers have failed to put a protective lip on the front of the core. These are usually older designs of both house locks and padlocks that were made before metallurgy had advanced and produced mylar foil. You can recognize these locks by a small gap between the core and the body that’s widen enough to allow you slip in a thin piece of mylar foil, called a shim.
Many guys open up those RFID tags that stores put onto valuable merchandise and remove the small foil strips found inside.
Those are perfect for shimming locks. Begin by sliding in the shim into the gap in the front of the lock until it hits the first pin. While maintaining gentle pressure on the shim, use your pick to raise the first pin until the shim slides between the key pin and the driver pin. That’s the shear line. Repeat that until the shim is between all of the pins and the core will rotate, opening the lock. When you find a lock with a gap, shims can really save you a lot of time.
.
.
If your lock is out of the housing you can also use shims to attack the shear line from the REAR. This is a common locksmith trick when a lock is difficult to pick. Slide the shim in from the rear until it’s against the last pin. Reach in with a pick and raise the key pin until the shim slides between the key pin and driver pin. Repeat this one pin at a time until the front-most pin is shimmed, then turn the core and open the lock. You can then pull out the core and re-pin the lock.
.
Impressioning
Entire books have been written about impressioning locks, most notably “Keys to the Kingdom: Impressioning, Privilege Escalation, Bumping, and other Key-Based Attacks Against Physical Locks”, by Deviant Ollam. Impressioning is possible because of the pin’s “binding effect” when the core is rotated – the same principle that makes lock picking possible. When impressioning you’ll need to prepare a blank key by lightly sanding flat the top surface with 600 grit sand paper. This grit will leave slight sanding marks on the surface, which is precisely what you want. Insert the prepared key into the lock and turn it back and forth several times. When you remove the key expose the prepared surface to a bright light and you’ll see rub marks, indicating the location each of the pins. Use a six inch, #4 Swiss cut round file to put a small groove at each mark. Make only 2-3 light swipes to locate the pins and leave a slightly textured finish in the grooves. Repeat. At some point only the binding pin will leave a rub mark, that’s what you are looking for. Make 2-3 light swipes with the file only on the binding pin’s location. Repeat. If you see a mark at the same location, give it another couple of swipes with your file – go slow. Repeat. At some point that pin will no longer leave a mark, but ANOTHER pin will. That’s the new binding pin, so give it a couple of swipes with your file. Continue doing this until the lock opens. Congratulations! You have just impressioned your first lock. The biggest mistake noobs make is filing away too much material because they get in a hurry. Once you’ve done that the game is over – and you’ve failed. Be SURE of your marks before filing and take your time. You may not get a mark every time. If that happens simply put the key back in and turn it some more. Try to not be too vigorous with the turning though or the key will weaken and break. If you see that happening, stop and cut a new key to the same depths then continue where you left off. For a LOT more detail on how to do this, check out Impressioning Manual for Amateur Locksmiths.
Foiling
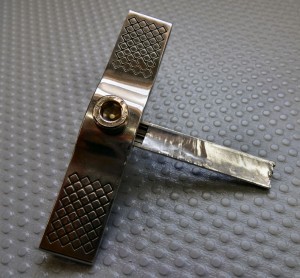 A very similar technique that’s faster and doesn’t require filing is called “Foiling”. This attack can be used against almost any kind of lock, but is most common against dimple locks. All you need is a key cut to the maximum depth at each pin location and a piece of insulation foil tape. Ideally the key will be slightly thinned so when you apply the foil tape to it slides smoothly into the keyway without binding.
Once in place, turn the key back and forth gently, forcing the binding pins to make an impression into the soft foil tape. Don’t remove the key to inspect your work because it’ll ruin the impressions. Keep working the key back and forth until all the pins have impressioned themselves down to the shear line. The lock will open and if you are careful (and a bit lucky) you can sometimes extract the key and see the approximate bitting. This will at least give you a good starting point if you decide to begin impressioning a key.
Unshielded Locks
Incredibly, there are many poorly designed padlocks that are “unshielded”, meaning that you can reach through the keyway and manipulate the actuator, unlocking the padlock. The only tool you’ll need is a “knife” pick that’s long enough to reach in and trip the actuator. This is truly one of those things that takes only a second to accomplish and looks like magic to untrained observers.
.
Bypassing
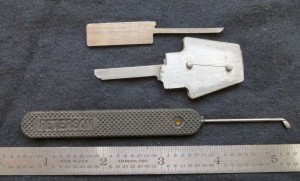 Even the most gifted lock designer can’t anticipate every possible attack technique. Some of the best padlocks in the world are made by American Lock Company (now owned by Master Lock Corporation), and ABUS, in Germany.
About 10 years ago Peterson was experimenting with some newly developed hardened wire and discovered that, when properly shaped, it could pass through the keyway and trigger the actuator with a twist, totally bypassing the lock. ABUS had licensed the mechanism for their own locks with slight modifications to their actuator, but the same technique could activate them as well. Before long, many other lock makers found their designs were also vulnerable to this bypass tool. The discovery was like a nuclear bomb hitting the lock industry because, until that time, the American locks had a reputation for being especially nasty to pick open, and this new tool basically destroyed their marketplace overnight. Within a very short time American came up with a workaround – a small stainless steel wafer that could be retrofitted to all of their locks. The wafer blocked the keyway, preventing the bypass tool from passing through the keyway. Problem solved, right? Wrong. Within a month Peterson introduced the “wafer breaker”, a key shaped device the passed through the keyway and punched a hole in the new (thin) wafer, again giving the bypass tool access to the actuator. In practice American still uses the original thin wafer in all new locks. This leaves millions of unprotected locks susceptible to this bypass. It’s a tool worth keeping in your tool kit.
.
Euro Lock Bypass
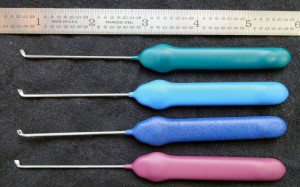 A large number of Euro-style locks are vulnerable to the same bypass as American and Abus padlocks. All it takes is a slightly longer wires than the American Bypass tool to pass through the lock and rotate the actuator, unlocking the door.
In the last 5-6 years most Euro cylinder manufacturers have corrected this design oversight, but there are still millions of vulnerable cylinders out there.
.
Comb Attack
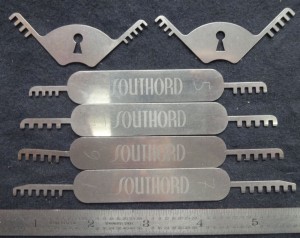 Lock designers occasionally leave too much room in the lock, allowing us to push the key pins all the way up into the bible. Once held up there by the comb pick, the shear line is cleared of pins and can rotate freely. Most older locks and many newer locks are vulnerable to this attack method.
The only constraint is the keyway itself. Strongly curved or warded keyways will not leave enough room for a comb pick to fit inside of. Pay attention when using combs as its easy for the pins to bind the tool into the keyway, leaving you vulnerable to ridicule from fellow pickers. If it gets stuck you can sometimes vigorously jiggle it loose, but I’ve gotten a few stuck that required me to cut the lock open.
.
Jiggler Keys
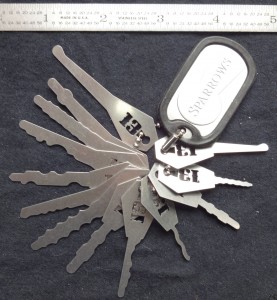 These are also sometimes called tryout-keys, but they aren’t used like keys. There’s no science to it, just choose one at random that fits into the keyway, hold on to the key ring, and jiggle it up and down, in and out. If that one doesn’t work after 15-20 seconds, try another one. Jigglers work well on the wafer locks found in older cars, padlocks, and simple pin tumblers. When a lock has totally frustrated me with failed pick attacks, my weapon of last resort are jiggler keys.
